
Sending emails to the spam folder is every email marketer’s worst nightmare.
It means your hard work, creativity, and budget are going to waste as your subscribers may never see your messages.
If you’re using SendGrid to send marketing or transactional emails and they keep landing in spam, it can be incredibly frustrating.
But don’t worry, we’ve got your back!
This comprehensive guide will walk you through a series of steps to diagnose and fix the issue of SendGrid emails going to spam.
We’ll cover everything from checking domain authentication and reputation to optimizing your email content and performing tests.
By following these proven strategies, you’ll be able to improve your email deliverability and ensure that your messages reach their intended recipients’ inboxes.
Check current domain authentication records
One of the most common reasons for emails ending up in spam is a lack of proper domain authentication.
Internet Service Providers (ISPs) and email providers use authentication methods like Sender Policy Framework (SPF), DomainKeys Identified Mail (DKIM), and Domain-based Message Authentication, Reporting, and Conformance (DMARC) to verify the legitimacy of email senders.
If your domain is not properly authenticated, your emails are more likely to be flagged as spam.
Therefore, the first step in fixing the issue is to ensure that your domain is correctly set up with these authentication protocols.
Head to the homepage of our website to use the Check My Domain tool.

This free tool will check if you have SPF, DKIM, and DMARC records configured correctly according to email authentication standards.
If any of these authentication methods are missing or improperly configured, the tool will flag them and provide instructions on how to set them up properly.
Set up SPF record for SendGrid
Sender Policy Framework (SPF) is a simple email authentication protocol that helps prevent spoofing by verifying that the email is being sent from an authorized mail server.
To set up an SPF record for your domain with SendGrid, follow these instructions.
Add the following include statement string to your existing SPF record:
include:sendgrid.net
If you don’t already have an SPF record, use the free SPF generator tool.
Here is an example SPF record for a domain that uses Google Workspace as their mailbox provider and SendGrid for transactional and marketing emails.
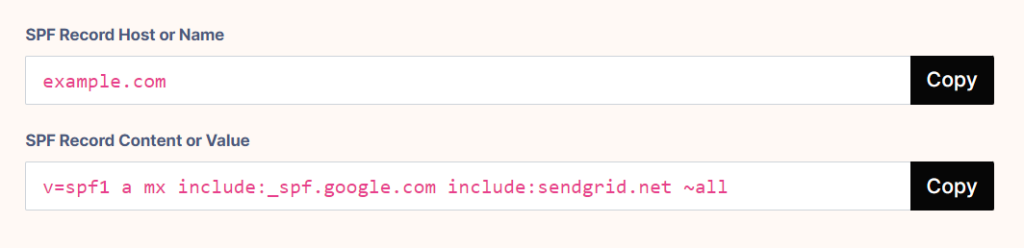
To modify your existing SPF record (or create a new record), you’ll need to log into your DNS or hosting provider. Follow these instructions:
- Log into your Account
- Navigate to the Domains page
- You should see a list of all your domains; click on the domain
- Click on DNS or Edit DNS
- Then click on Host Records or Edit Host Records
- Now you will have the option to create a new record
- For the record Type select TXT
- For the Host/Name field enter the @ character or your domain (example.com), both are acceptable
- For the Content/Value field copy and paste the SPF record we generated for you
- For the TTL field leave it as-is to use the default value
- Click Save to complete your updates.
Once the SPF record is added, it may take several hours for the change to propagate across the internet.
Set up Domain Authentication (DKIM) records for SendGrid
DomainKeys Identified Mail (DKIM) is another email authentication protocol that helps protect against spoofing by using digital signatures.
To set up domain authentication with SendGrid you’ll need to add several TXT and CNAME records to your DNS, follow these instructions.
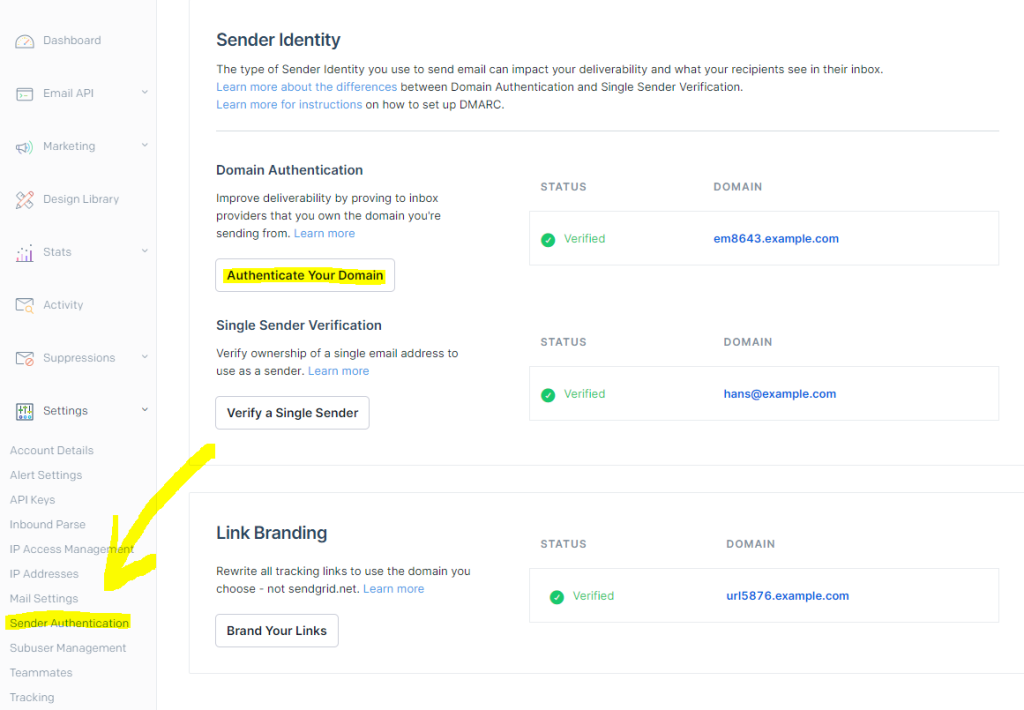
- In the Twilio SendGrid App user interface (UI), select Settings > Sender Authentication .
- In the Domain Authentication section, click Get Started . The Authenticate Your Domain page will load.
- From the Authenticate Your Domain page, select your DNS host from the drop-down menu below the text: Which Domain Name Server (DNS) host do you use? You can select I’m not sure or Other Host (Not Listed) if necessary.
- You can choose to set up Link Branding by choosing Yes below the text: Would you also like to brand the links for this domain? If you choose No, you can add Link Branding at a later time. Link Branding is not a required part of the Domain Authentication process.
- Click Next, then a second Authenticate Your Domain page will load.
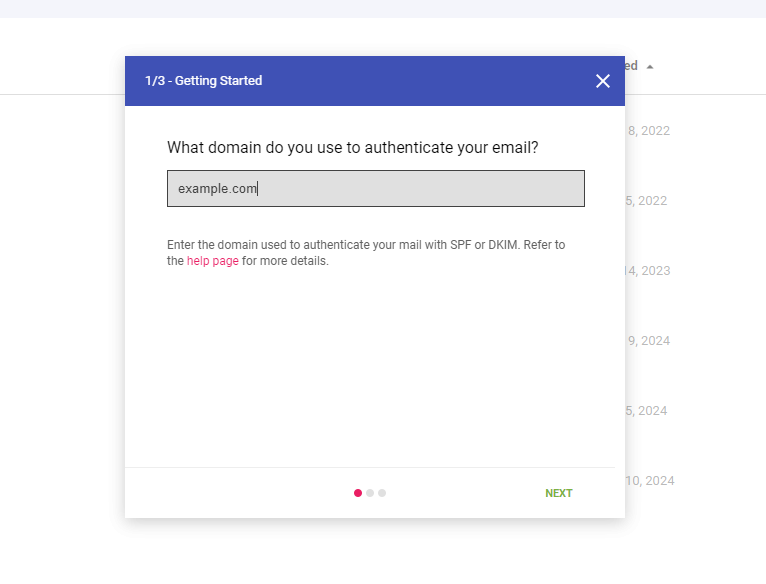
- From the new page, add the domain you want to authenticate below the text: Domain You Send From. This will be the domain that appears in the from address of your messages. For example, if you want your messages to be from addresses like
[email protected], you will authenticateexample.com. Make sure that you enter only your root domain<domain-name.top-level-domain>. Do not include a subdomain or protocol such aswwworhttp://wwwin this field. - Select the Advanced Settings appropriate for your needs. Most customers can leave Use automated security checked and continue.
- Click Next. The Install DNS Records page will load.
- The Twilio SendGrid App will now determine if we can automatically finish the Domain Authentication process for you. If we can automatically finish the setup, you will be taken to the Automatic Setup tab. If we cannot automatically finish the setup, you will be taken to the Manual Setup tab.
- If you cannot modify your domain’s DNS records, you can email the records to a colleague using the Send To A Coworker tab. The email includes a direct link to the records. The recipient doesn’t need to log in to your Twilio SendGrid account.
As with the SPF record, it may take a few hours for the DKIM changes to propagate across the internet.
Set up DMARC record
Domain-based Message Authentication, Reporting, and Conformance (DMARC) is a protocol that works in conjunction with SPF and DKIM to help receiving servers identify legitimate email sources and reject or quarantine messages that fail authentication.
Having a DMARC record is now a requirement under Google and Yahoo’s new requirements for bulk senders.
To set up a DMARC record for your domain, use the free DMARC generator tool, then follow the setup instructions.
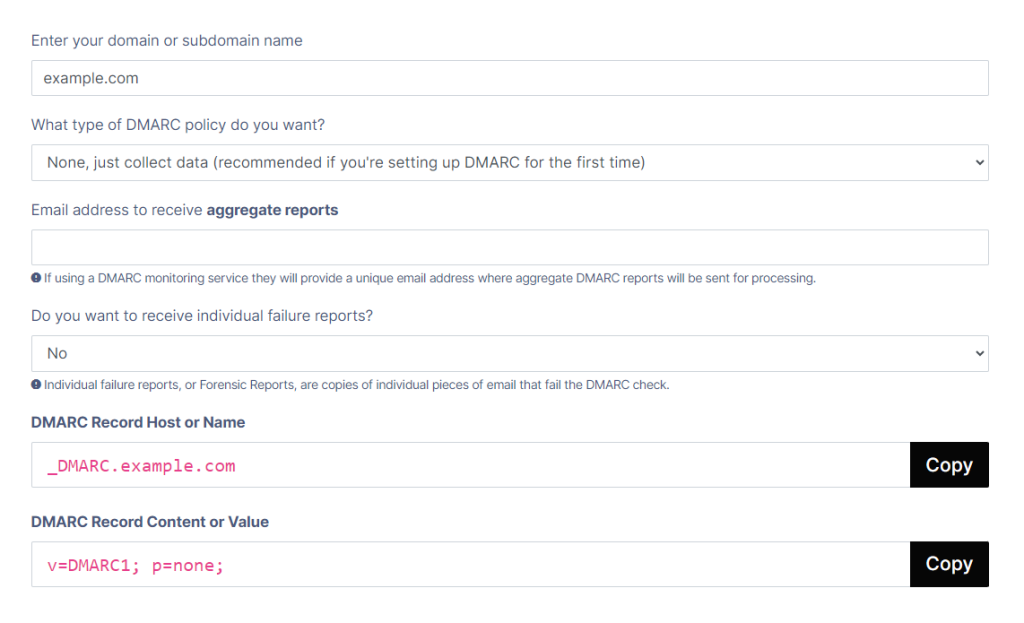
Once you’ve generated the record, you’ll need to log into your DNS or hosting provider to add the TXT record to your DNS. Follow these instructions:
- Log into your Account
- Navigate to the Domains page
- You should see a list of all your domains; click on the domain
- Click on DNS or Edit DNS
- Then click on Host Records or Edit Host Records
- Now you will have the option to create a new record
- For the record Type select TXT
- For the Host/Name field enter
_dmarc - For the Content/Value field, copy and paste the DMARC record generated for you
- For the TTL field leave it as-is to use the default value
- Click Save to complete your updates.
Add your domain to Google Postmaster Tools
Google Postmaster Tools is a free service provided by Google that helps domain owners monitor and improve their email deliverability.
By adding your domain to Postmaster Tools, you’ll be able to access valuable insights and data about your email performance, reputation, and potential issues.
To add your domain to Google Postmaster Tools, follow these steps:
- Visit Google Postmaster Tools and sign in with your Google account.
- Click on the large red button and enter your domain name.
- Follow the instructions provided to verify your domain ownership.
- Once your domain is verified, you’ll have access to the Postmaster Tools dashboard for your domain with deliverability metrics.
Check Domain Reputation and Spam Rate in Google Postmaster Tools
After adding your domain to Google Postmaster Tools, you can check its reputation and spam rate.
This information can help you identify potential issues that may be causing your SendGrid emails to go to spam.
In the Postmaster Tools dashboard, click on your domain to view deliverability metrics.
Here, you’ll find metrics such as:
- Domain Reputation: This reflects the overall reputation of your domain based on various factors, including complaints and spam reports.
- Spam Rate: This is the percentage of your emails that are marked as spam by Gmail users.
- IP Reputation: This shows the reputation of the IP addresses you’re using to send emails.
If your domain or IP reputation is low, or if your spam rate is high, it could be a contributing factor to your SendGrid emails going to spam.
You’ll need to take steps to improve these metrics, which we’ll cover in the following sections.
Check sending IP address reputation
The reputation of the IP addresses you’re using to send emails can significantly impact your email deliverability.
If your sending IP addresses have a poor reputation, your emails are more likely to be flagged as spam.
To check the reputation of your SendGrid sending IP addresses, you can use various online tools and services, such as:
These tools will provide you with a reputation score for your IP addresses based on factors like spam complaints, blacklistings, and other metrics.
If your IP addresses have a low reputation score, you may need to consider using a different IP pool or working with SendGrid to improve the reputation of your existing IP addresses.
Check Spam Complaint and Hard Bounce rate in SendGrid
SendGrid provides valuable metrics and reports that can help you identify potential issues with your email campaigns.
Two critical metrics to monitor are the Spam Complaint rate and the Hard Bounce rate.
The Spam Complaint rate reflects the percentage of your SendGrid emails that recipients marked as spam.
A high Spam Complaint rate can negatively impact your sender reputation and email deliverability.
To check your Spam Complaint rate in SendGrid, follow these steps:
- Log in to your SendGrid account and navigate to the “Stats” menu.
- Under the “Deliverability Insights” section, you’ll find the “Spam & unsubscribes” metric.
- Click on the “Spam & unsubscribes” metric to view more detailed information and historical data.
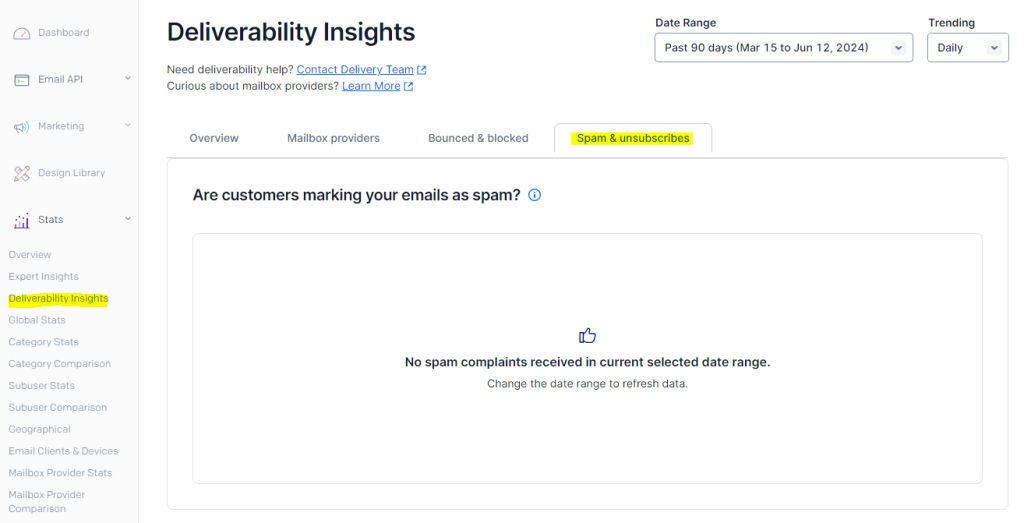
If your Spam Complaint rate is consistently higher than the recommended threshold (typically 0.1%), you’ll need to take steps to address the issue, such as improving your email content and list hygiene.
The Hard Bounce rate represents the percentage of your SendGrid emails that couldn’t be delivered due to invalid or non-existent email addresses.
A high Hard Bounce rate can also negatively impact your sender reputation and email deliverability.
To check your Hard Bounce rate in SendGrid, follow these steps:
- Log in to your SendGrid account and navigate to the “Statistics” menu.
- Under the “Deliverability Insights” section, you’ll find the “Bounced & blocked” metric.
- Click on the “Bounced & blocked” metric to view more detailed information and historical data.
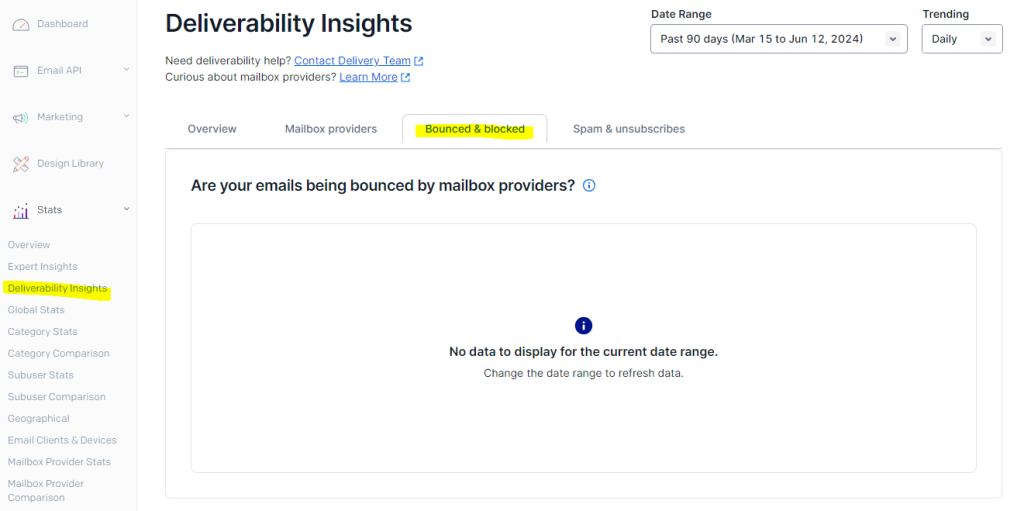
If your Hard Bounce rate is consistently higher than the recommended threshold (typically 2%), you’ll need to take steps to improve your email list hygiene, such as removing invalid/bounced addresses.
How to reduce Spam Complaint and Hard Bounce rate
If your spam complaint or bounce rates are too high, there are some steps you can take to get them under control:
- Only send to opt-in, engaged email lists
- Practice good list hygiene and remove invalid/bounced addresses
- Make it easy for recipients to unsubscribe
- Warm up new IP addresses gradually
- Don’t use deceptive or misleading subject lines
- Set proper expectations about the emails you send
Check subject line for words or special characters that will trigger spam filters
The subject line of your email plays a crucial role in determining whether it will be flagged as spam or not.
Certain words, phrases, and special characters can trigger spam filters, causing your emails to end up in the spam folder.
Here are some tips for optimizing your subject line to avoid spam filters:
- Avoid spam trigger words: Words like “free,” “earn,” “money,” “discount,” and “promotion” are often associated with spam emails and should be used sparingly or avoided altogether.
- Be cautious with special characters: Excessive use of special characters, such as exclamation points (!!!), dollar signs ($$$), or excessive capitalization, can make your subject line look spammy.
- Keep it concise and relevant: A clear, concise, and relevant subject line is less likely to be flagged as spam. Avoid using irrelevant or misleading subject lines.
- Test your subject lines: Before sending your email campaign, perform a few tests with your test accounts to check if your subject line is likely to trigger spam filters.
By following these guidelines, you can improve the chances of your SendGrid emails reaching the intended recipients’ inboxes.
Check content for words, images or links that will trigger spam filters
Just like the subject line, the content of your email can also trigger spam filters if it contains certain words, images, or links that are associated with spam.
Here are some tips for optimizing your email content:
- Avoid spam trigger words: Similar to subject lines, certain words like “free,” “earn,” “discount,” “make money,” and “opportunity” should be used cautiously or avoided in your email body.
- Be mindful of image-to-text ratio: Emails with a high ratio of images to text can be flagged as spam. Aim for a balanced combination of images and text.
- Avoid using too many links: While including relevant links is acceptable, excessive linking, especially to untrustworthy or suspicious websites, can trigger spam filters.
- Use clear and concise language: Spammy emails often contain convoluted language, poor grammar, and excessive punctuation. Use clear, concise, and well-written language in your email content.
- Include an unsubscribe link: Legitimate email campaigns should always provide an easy way for recipients to unsubscribe or opt-out if they no longer wish to receive your emails.
By following these guidelines and creating well-crafted email content, you can reduce the chances of your SendGrid emails being marked as spam.
Check image-to-text and link-to-text ratio
As mentioned earlier, the ratio of images and links to text in your email content can be a significant factor in determining whether it will be flagged as spam or not.
Email service providers and spam filters often look for excessive use of images and links, which can be a sign of spammy or malicious content.
To avoid triggering spam filters based on these ratios, it’s important to strike a balance between the use of images, links, and text in your email content.
Here are some general guidelines:
- Image-to-Text ratio: Aim for an image-to-text ratio of around 30-40%. This means that the text content should make up at least 60-70% of your email.
- Link-to-Text ratio: A good rule of thumb is to have no more than one link for every 100 words of text. Excessive linking can be seen as spammy behavior.
- Relevant and descriptive alt text: Ensure that all images in your email have relevant and descriptive alt text. This not only improves accessibility but also helps email providers understand the content of your images.
- Trusted and reputable links: Only include links to trusted and reputable websites. Linking to suspicious or blacklisted domains can significantly impact your email deliverability.
By maintaining a healthy balance of images, links, and text in your SendGrid emails, you can improve your chances of avoiding spam filters and reaching your recipients’ inboxes.
Verify image alt tags are present and descriptive
Adding descriptive alt text to your images also helps prevent them from being blocked by spam filters looking for malicious image content.
The alt text should accurately describe the image and its context within the email. For example:
<img src="sunsetbeach.jpg" alt="Peaceful sunset over ocean waves on a tropical beach" />
Perform a test and check where it lands
After implementing the various strategies and optimizations outlined in this guide, it’s crucial to perform a test to see if your SendGrid emails are still being flagged as spam or if they’re landing in the intended recipients’ inboxes.
Here are some steps you can take to perform a comprehensive test:
- Set up email testing accounts: Create testing email accounts with popular email service providers like Gmail, Outlook, Yahoo, and others. These accounts will be used to receive and analyze your test emails.
- Send test emails: From your SendGrid account, send test emails to these testing accounts. Make sure to include a variety of email content, subject lines, and formatting to get a comprehensive understanding of how your emails are being handled.
- Check inbox placement: Check the inboxes of your testing accounts to see where your SendGrid emails have landed. If they’ve ended up in the spam or junk folder, make a note of it.
- Analyze the results: Review the results of your tests and identify any patterns or recurring issues that may be causing your SendGrid emails to be marked as spam.
- Iterate and refine: Based on your analysis, make further adjustments to your email content, subject lines, authentication settings, or other factors that may be contributing to the spam issue.
- Repeat the testing process: After making the necessary changes, perform another round of testing to ensure that your SendGrid emails are now landing in the intended recipients’ inboxes.
By following this iterative process of testing, analyzing, and refining, you can continuously improve your inbox placement and ensure that your SendGrid emails reach their intended destinations.
Use a warmup and reputation repair service like Inbox Ally
If you’re still having inbox placement issues, using an email warmup and reputation repair service like InboxAlly.com can help get your emails delivered.
These services gradually send your emails to real seed inboxes across all major providers and platforms, generating positive user engagement signals that improve your domain and IP reputations over time.
While more expensive than basic email services, warmup and reputation repair can be worthwhile for serious senders struggling with deliverability.
Frequently asked questions
How long does it take for changes to domain authentication and DNS records to take effect?
It can take up to 48-72 hours for changes to domain authentication records (SPF, DKIM, DMARC) and DNS records to propagate across the internet. During this time, your email deliverability may still be affected.
Should I use a shared or dedicated IP address for sending emails with SendGrid?
If you’re just starting out or have a lower email volume, you can begin with a shared IP address.
As your email volume grows or if you require better reputation control, you can consider upgrading to a dedicated IP address.
SendGrid provides tools and guidelines to help you manage your IP reputation effectively, regardless of which option you choose.
How often should I monitor my email metrics and reputation?
It’s a good practice to monitor your email metrics, such as spam complaints, hard bounces, and domain reputation, on a regular basis.
Many email service providers, including SendGrid and Google Postmaster Tools, offer daily or weekly reporting options.
What should I do if my SendGrid emails continue to go to spam despite following all the recommendations?
If your SendGrid emails continue to go to spam despite following the recommendations in this guide, you may need to seek additional support from SendGrid or consider booking a 1 hour consultation call with our team.
In some cases, a persistent spam issue may be caused by factors beyond your control, such as global blacklistings or reputation issues.
By addressing these frequently asked questions, you’ll have a better understanding of the email deliverability landscape and the steps you can take to ensure your SendGrid emails reach their intended recipients’ inboxes.
